How to make PDF files smaller in Mac OS X
Permalinks to this entry: individual page or in monthly context. For more material from my journal, visit my home page or the archive.
Mac OS X's pretty face user interface of images and text is built on Adobe's Portable Document Format (PDF) standard, which means it's always been easy to save a PDF file from any application, simply by choosing File > Print and clicking Save as PDF. The problem is, those files are often quite large, in order to keep them as high-quality as possible.
Until now, I thought the only way to make them smaller was to have a copy of Adobe's commercial Acrobat program, which lets you tweak the compression of images and text so the files shrink to more manageable size (usually at some slight detriment to quality or portability). Well, it turns out that's not necessary:
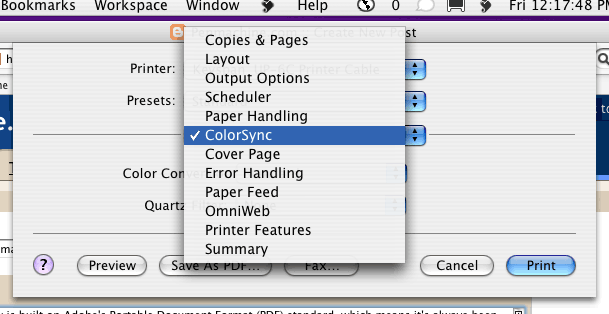
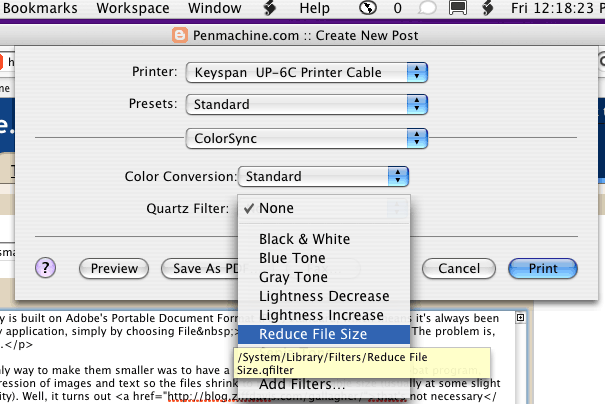
[There's] an easy workaround to this problem using a "hidden" feature of printing in Mac OS X 10.3 that I had completely overlooked. The "ColorSync" settings within the Print dialogue for Panther allow you to select "Reduce File Size" as an option for saving to PDF.
Here's what it looks like.
UPDATE October 2009: Later versions of Mac OS X, such as 10.5 Leopard and 10.6 Snow Leopard, have made this procedure a little more complicated, but it's still possible. Plus you can now shrink existing PDF files as well. See my update comment from August 2009 for details.
In any Mac OS X program, choose File > Print, then choose ColorSync from the bottom-most pop-up menu (which usually reads Copies & Pages to start):
Next, in the ColorSync section that appears at the bottom, choose Reduce File Size from the Quartz pop-up menu:
Finally, simply click Save As PDF. I haven't tested how much smaller it makes files, but it should help somewhat, especially in files with lots of graphics. Sure, Adobe Acrobat still gives you lots more options, but this method is built into the operating system, thus saving you hundreds of dollars.


